Last updated: August 20, 2026
Table of Contents
- What Full Stucco Remediation Actually Fixes
- 7 Warning Signs You Need Stucco Remediation, Contractors
- Cracked Stucco, Small Cracks, and What Counts as Real Stucco Damage
- Stucco Remediation vs. Stucco Repair: What’s Actually Different
- What the Remediation Process Looks Like for Existing Stucco
- EIFS and Synthetic Stucco: Codes, Certification, and Insurance
- How Temperature Extremes and Climate Affect Stucco
- Free Estimate and Cost Guide for Stucco Remediation
- How to Choose Stucco Contractors for a Remediation Project
- When Stucco Repairs Make More Sense Than Full Remediation
- Case Study: A Cracked Stucco Wall, Remediated
- Frequently Asked Questions About Stucco Remediation
- Does homeowners insurance cover stucco remediation?
- How long does a stucco remediation project take?
- What maintenance does stucco need after remediation?
- Get a Free Estimate From a Local Stucco Contractor
Stucco remediation contractors step in once moisture has already gotten behind the wall, not just cracked the surface, and catching that shift early is what keeps a small repair from turning into a full tear-off.
Stucco water damage rarely announces itself with a dramatic leak.
It usually shows up first as a faint stain, a hairline crack, or caulking that has pulled away from a window frame.
By the time stucco looks obviously bad, moisture intrusion has often been at work behind the surface for months or years.
This guide walks through the seven warning signs that separate a simple patch job from a job that needs full remediation, plus what the process, cost, and contractor vetting actually look like in 2026.
What Full Stucco Remediation Actually Fixes
Remediation replaces the failed layers behind stucco, the sheathing, the water-resistive barrier, sometimes the framing, instead of skimming new material over a wet wall.
Faulty stucco installation is one of the most common root causes of repeat failures, since a missing weep screed or a gap in flashing can undermine even a brand-new finish coat.
Skipping structural repair and patching only the surface can leave trapped moisture free to keep rotting wood and feeding mold long after the crack looks fixed.
Properly remediated stucco can last 50 to 80 years, according to stucco material manufacturers and building-science research, while a surface patch over an unresolved moisture problem typically fails again within a few years.
Homeowners who call in stucco remediation contractors while damage is still limited to a wall or two generally spend far less than homeowners who wait until framing and interior finishes are involved.
Insurance carriers also scrutinize stucco claims closely, since improperly installed or improperly repaired stucco is a common source of denied claims, another reason to fix the underlying problem instead of covering the symptom.
7 Warning Signs You Need Stucco Remediation, Contractors
These seven signs tend to show up before a full-blown leak does, and any one of them is worth a professional look.
- Water stains or dark streaks on exterior walls, especially beneath windows, rooflines, or balconies.
- Cracked stucco that keeps reopening after being patched once or twice.
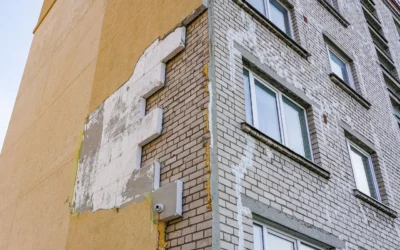
- Soft, hollow, or crumbling stucco that gives when pressed or sounds hollow when tapped.
- Dry, shrinking, or missing caulking around windows and door trim.
- Musty odors or visible mold on interior walls that back up to exterior stucco.
- Bubbling, peeling, or blistering paint on stucco surfaces.
- Warped or discolored trim and siding where it meets the stucco.
One sign alone might mean a simple repair.
Two or more together usually point to moisture that has already reached the substrate.
Cracked Stucco, Small Cracks, and What Counts as Real Stucco Damage
Not every crack means trouble.
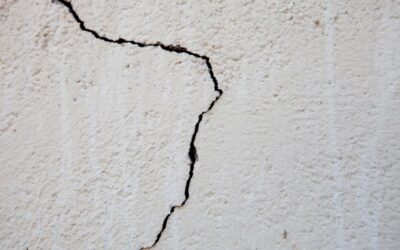
Hairline cracks under 1/16 inch are common as stucco cures and a house settles, and they’re usually cosmetic on their own.
The catch is that hairline cracks can let water behind the wall over time, which is why they’re worth tracking rather than ignoring.
A simple habit works well here: photograph small cracks next to a coin or ruler for scale, note the date, and check again after the next heavy rain.
Pay closer attention around windows, doors, and any penetration vents, light fixtures, and hose bibs since these transitions are where flashing and caulking most often fail first.
For a closer look at what stucco water damage looks like up close, how to tell if stucco has water damage walks through the visual signs in more detail.
Stucco Remediation vs. Stucco Repair: What’s Actually Different
Stucco repair patches the surface; it fills a crack, re-textures a small area, and matches the color.
Repair is a quick fix, not a long-term solution, and it works well when the damage is cosmetic and the wall behind it is still dry.
Stucco remediation goes further: it removes the damaged stucco, replaces the sheathing or framing underneath if it’s compromised, rebuilds the water-resistive barrier, and reapplies new stucco over a sound structure.
When moisture intrusion is limited to one small area, a repair is often enough to protect the wall. Whether a wall can be spot repaired comes down to whether the system behind it is still dry and sound.
When staining, soft spots, or cracking show up in multiple places, or a previous repair has already failed, remediation is the option that resolves the underlying problem instead of covering it again.
What the Remediation Process Looks Like for Existing Stucco
The process starts with a moisture and substrate inspection.
Contractors use diagnostic tools like moisture meters to find trapped moisture that isn’t visible from the surface, then map how far it has spread.
Next comes removal: damaged existing stucco gets cut back to sound material, often exposing the sheathing and framing underneath.
Stucco remediation projects often involve replacing damaged plywood sheathing and repairing or sistering rotted framing before any new material goes back on.
Crews then install a new water-resistive barrier and flashing. Correct flashing installation is one of the biggest factors in preventing repeat water infiltration before the lath and new stucco go on.
The final coat is textured and color-matched to blend with the surrounding surface, ideally so the repair isn’t visible from the street.
For homeowners who aren’t sure whether they’re looking at a repair or a remediation job, a professional stucco inspection is usually the clearest first step.
EIFS and Synthetic Stucco: Codes, Certification, and Insurance
Synthetic stucco, more formally known as EIFS (exterior insulation and finish systems), is a layered wall assembly rather than traditional hard-coat stucco, and it fails differently.
Because EIFS relies on a continuous drainage plane behind rigid foam insulation, a single gap in flashing or sealant can trap water against the sheathing for years before staining ever shows up outside.
Most manufacturers require installers to complete manufacturer-specific training before they’ll back the system with a warranty, and current codes in most jurisdictions call for a drainage EIFS assembly rather than the older barrier-style systems, which is a common source of stucco failure in older homes.
The EIFS Industry Members Association publishes installation and inspection guidance that’s worth reviewing directly if a home has synthetic stucco.
If a home has EIFS, it’s worth asking who installed it, whether it meets current drainage-code requirements, and keeping any documentation on hand, since insurers increasingly ask for it when poor installation is involved in a coverage dispute.
How Temperature Extremes and Climate Affect Stucco
Temperature extremes stress stucco because the material expands and contracts at a different rate than the wood or wire lath underneath it.
Sharp temperature swings between a hot afternoon and a cool evening are common across the Los Angeles area, creating small expansion cracks over time, especially on walls that get direct afternoon sun.
Hard freezing is rare across most of Southern California, but the same wet-dry, hot-cold cycling that does happen locally still opens hairline cracks that let moisture in during the rainy season.
Climate-appropriate material selection matters too: a flexible, crack-resistant finish coat holds up better under repeated temperature swings, and it protects both the appearance and the durability of the exterior longer than a rigid, older-style stucco mix.
Free Estimate and Cost Guide for Stucco Remediation
Stucco remediation costs vary widely because price follows the extent of the damage, not the square footage of the house.
As a general industry range, basic stucco work runs about $6 to $9 per square foot, and small remediation projects addressing a limited damaged area often fall between $1,000 and $9,000; a job involving a full wall, structural repairs, or multiple walls typically costs several times that.
Homeowners researching stucco repair cost online often find a wide spread of numbers for exactly this reason: the underlying moisture problem, not the finish coat, sets the price.
Other cost drivers include how much framing or sheathing needs replacing, how large an area needs new lath and stucco, and how closely the new texture has to match the rest of the exterior.
Ask any contractor for a free estimate that explicitly covers moisture testing and a written diagnosis, not just a number based on a visual walk-around, and get more than one estimate before deciding.
How to Choose Stucco Contractors for a Remediation Project
Start by verifying that stucco contractors are licensed and insured in the state where the work will happen. This protects the homeowner if something goes wrong mid-project.
Ask to see photos of past remediation jobs, not just finished stucco; photos of the removal and structural-repair stages show whether a contractor’s expertise actually addresses the substrate or just resurfaces it.
Request references from homeowners with similar existing stucco problems, and ask those references directly whether the repair held up.
A trustworthy contractor provides a detailed written scope of work describing exactly what will be removed, repaired, and replaced, along with a warranty covering both labor and materials.
If a bid doesn’t explicitly mention moisture testing or diagnosis, that’s worth asking about before signing anything.
When Stucco Repairs Make More Sense Than Full Remediation
Cosmetic issues: a small hairline crack, a chip near a corner, a patch of surface staining with no soft spots underneath: are usually a good fit for a straightforward repair.
Monitoring a hairline crack is simple: check it every few months, especially after heavy rain, and watch for growth, darkening, or a soft spot forming nearby.
If the same spot needs patching two or three times within a couple of years, that repeat pattern is itself a warning sign that something behind the wall is still wet, and it’s time to look at remediation instead of another patch.
Case Study: A Cracked Stucco Wall, Remediated
Here’s a representative example of how a typical remediation project unfolds, based on the process outlined above; it’s illustrative, not a specific client project.
A homeowner notices cracked stucco below a second-story window, with a faint water stain that gets slightly darker after every rainstorm.
An inspection with a moisture meter finds elevated readings behind roughly 40 square feet of wall, along with softened sheathing near the window’s bottom corner.
The crew removes the damaged stucco and sheathing in that section, repairs the framing, installs new flashing around the window, rebuilds the water-resistive barrier, and reapplies stucco with a matching texture and color.
The result: a completed wall that matches the rest of the exterior with no visible seam, backed by a written warranty covering the completed work: the kind of craftsmanship and coverage homeowners should expect from any detailed scope of work.
Frequently Asked Questions About Stucco Remediation
Does homeowners insurance cover stucco remediation?
It depends on the cause.
Sudden water damage from a covered peril, like a burst pipe, is often covered, while gradual moisture intrusion from poor installation or deferred maintenance frequently is not.
The Insurance Information Institute lists water damage among the most common and costly homeowners insurance claims each year, which is part of why insurers ask for documentation showing both the cause and the repair.
How long does a stucco remediation project take?
Most single-wall or limited-area remediation projects take one to two weeks from removal to final texture coat, including time for new stucco to cure properly between coats.
Larger, multi-wall projects on single-family homes can take several weeks, especially when structural framing repairs are involved.
What maintenance does stucco need after remediation?
Recently remediated stucco still needs the same routine care as any exterior: annual visual inspections, prompt recaulking around windows and doors when caulking dries out, and quick attention to any new staining or cracking.
Catching small cracks early is what keeps a remediated wall performing for decades instead of needing another round of repair.
Get a Free Estimate From a Local Stucco Contractor
Scheduling an on-site estimate is the first step, and it’s worth doing as soon as any of the seven signs above shows up rather than waiting for the next rainy season.
Preparing for the visit helps: pull together photos of the affected area over time, the age of the stucco or the last known repair date, and any insurance documentation if a claim is involved.
Compare at least three written estimates, checking that each one covers moisture testing, a clear scope of work, and a warranty, not just a total price.
A little preparation up front makes it much easier to spot a fair, complete bid among contractors who specialize in remediation versus one that’s missing a step. For homeowners planning a project, our team also provides stucco repair and installation in Pasadena. Reach out for a free on-site estimate. Trapped moisture behind a wall system is also a mold risk, and the EPA’s guidance on mold explains why fixing the water source matters more than treating the surface.

Bryan Peralta is the Owner and CEO of Modern Builders, a Southern California contractor specializing in stucco remediation, waterproofing, and building envelope restoration. With years of experience helping homeowners and commercial property owners protect their properties, Bryan is known for delivering high-quality craftsmanship and long-lasting solutions. Through Stucco Contractor Pro, he shares expert insights on stucco repair, waterproofing, and exterior building maintenance.