Table of Contents
- Overview
- What Is Stucco?
- Pros and Cons
- How To Apply Stucco
- Preparing The Worksite
- Moisture Protection And Expansion Joints
- Lath, Trim, And Control Joints
- Three-Coat Stucco Application
- Apply Stucco: One- and Two-Coat Alternatives
- Expansion Joints (Detailed)
- Curing, Cleaning, And Maintenance
- Substrate Differences: Masonry Versus Wood Sheathing
- Troubleshooting And Frequently Asked Questions
- Safety, Cleanup, And Final Walk-Through
- Time Is an Ingredient
Stucco installation on a typical house takes about two to four weeks from prep to final coat, and most of that time is spent waiting for cement to cure.
Residential code requires at least 48 hours between the scratch coat and the brown coat, then at least 7 more days before the finish coat.
Skip those waits and the cement never reaches full strength, which invites cracks, leaks, and early failure.
Overview
Stucco is a hard wall coating made from cement, sand, lime, and water.
It covers house exterior walls, garden walls, and chimneys, and plasterers also use it on interior accent walls.
A professional stucco installation follows one of three methods:
- Three-coat: scratch, brown, and finish coats over metal lath, the traditional choice for wood-framed homes.
- Two-coat: a base coat and finish coat, common over sound masonry or concrete.
- One-coat: a single application of fiber-reinforced base plus a thin finish.
A Realistic Stucco Installation Timeline
The code minimums add up fast: 48 hours plus 7 days means at least 9 days between the first coat and the final layer.
| Stage | Work | Minimum wait before next step |
|---|---|---|
| 1 | Scaffolding, tear-off, framing repairs, protection | Varies with wall condition |
| 2 | Paper, flashing, weep screed, lath, trim, joints | Lath inspection, where required |
| 3 | Scratch coat | 48 hours |
| 4 | Brown coat | 7 days |
| 5 | Finish coat and texture | Manufacturer’s cure time |
| 6 | Cleanup and walk-through | None |
Stages 1 and 2 usually take a few days, and rain or cold can stretch any stage.
What Is Stucco?
Stucco is a mixture of Portland cement, sand, lime, and water that hardens as the cement hydrates.
Builders have used lime and cement plasters for centuries because they shed rain, resist fire, and hold texture.
The lime makes stucco breathable, so water vapor escapes instead of staying trapped.
Crews either buy premixed bags or job-mix materials on site, and many base coat products add fibers to limit shrinkage cracks.
Pros and Cons
Stucco is a long lasting, low-upkeep siding, but it is less forgiving of water and poor workmanship than many homeowners expect.
Benefits
- InterNACHI’s life expectancy chart lists stucco at 50+ years.
- Portland cement plaster is non-combustible, which adds fire resistance.
- Thermal mass slows heat moving through walls and helps energy efficiency.
- The surface looks seamless, with fewer visible seams than panel siding.
- Texture can be smooth or rustic, and color can be tinted in many shades.
Downsides
- Hairline cracks can form from temperature changes and settling.
- Stucco performs best in dry, arid climates and needs careful drainage design in wet ones.
- Trapped moisture can rot framing and grow mold behind a sound-looking surface.
- Patches are hard to blend because texture and color rarely match.
How To Apply Stucco
To apply stucco correctly, a crew builds a drainage layer, fastens lath, and places each coat only after the one before it has cured.
Tools and materials: scaffolding, a mortar mixer, hawk, trowels, darby, and floats, plus building paper, galvanized lath, fasteners, trim, cement, lime, sand, and a hose with a fog nozzle.
Step sequence
- Prepare and protect the worksite.
- Hang paper and install flashing.
- Attach weep screed, lath, and trim.
- Apply and moist cure the scratch coat.
- Apply and moist cure the brown coat.
- Apply the finish coat and texture.
- The final step is misting, inspection, and cleanup.
Weather limits: Industry guidance based on ASTM C926 calls for protection below 40°F, and plaster never goes on a frozen surface.
Hot, dry, windy days pull water from fresh cement, and heavy rain can wash it out, so crews shade and cover walls.
Preparing The Worksite
Good preparation decides whether new stucco will adhere properly.
- Scaffolding: OSHA requires guardrails or fall arrest for workers more than 10 feet above a lower level.
- Removal: Crews tear off old stucco, lath, and paper down to the sheathing, then clear debris daily.
- Inspection: Framing and plywood get checked for rot and termite damage, and bad wood is replaced.
- Protection: Plastic sheets cover windows, doors, roof edges, and plants, because wet cement etches glass and harms landscaping.
A sound wall may not need a tear-off, so see when putting new stucco over old stucco works.
Moisture Protection And Expansion Joints
Water management behind stucco matters as much as the plaster, because cement absorbs rain and lets some moisture through.
WRB method: Over wood sheathing in dry climates, residential code calls for two layers of Grade D waterproof building paper, or 60-minute paper with a drainage space.
Installers work bottom to top so each upper sheet laps over the one below.
Head flashing above windows and doors tucks under the paper above it, and kick-out flashing belongs where a roof edge meets a wall.
Rain screen: In moist or marine climates, code adds a drainage space or mat at least 3/16 inch deep so water can drain and air can dry the wall.
Weep screed: A corrosion-resistant weep screed sits at the wall base, at least 4 inches above grade or 2 inches above paving, so trapped water can exit.
Expansion joints: These go wherever the building itself will move, covered in detail below.
Lath, Trim, And Control Joints
Lath types: Galvanized expanded metal lath, commonly 2.5 pounds per square yard for walls, and woven wire lath are the standard options, and self-furring styles hold the metal off the paper.
Fastening: Code allows 1 1/2-inch, 11-gauge nails or 7/8-inch, 16-gauge staples, spaced no more than 7 inches apart along studs.
ASTM C1063 calls for fasteners to penetrate wood framing at least 3/4 inch.
Casing beads and corners: Casing beads frame windows and doors and leave room for sealant, while corner aids set plumb outside corners and act as depth guides.
Control joints: ASTM C1063 limits wall panels to 144 square feet, 18 feet in any direction, and a 2 1/2 to 1 length-to-width ratio.
Three-Coat Stucco Application
A three-coat system is built in order: scratch coat, brown coat, then finish coat.
The two base layers together must reach at least 3/4 inch, and the finish brings the system to about 7/8 inch.
The first coat needs at least 48 hours before the brown coat, and the brown coat needs at least 7 days before the finish.
Before each coat application, the crew checks for soft spots, hollow sounds, exposed lath, and uneven planes.
This breakdown of each stucco coat explains what every layer does.
Scratch Coat
A workable mix holds its shape on a tilted trowel without sliding or crumbling.
The plasterer forces material into the lath with firm trowel pressure so it wraps behind the metal.
The scratch coat must be at least 3/8 inch thick and screeded flat to that depth.
Once it is thumb-print hard, the crew rakes horizontal grooves so the next coat can grip.
Brown Coat
The brown coat is applied directly over the grooved scratch coat after its 48-hour cure.
This layer adds at least 3/8 inch and gets rodded with a straightedge until the wall is flat.
The plasterer floats it to a uniform surface and moist cures it evenly for 48 hours.
The 7-day wait that follows lets shrinkage cracks show up now, so the finish covers them.
Stucco Finish and Sand Finish Options
The stucco finish is the thin decorative layer, usually about 1/8 inch thick.
- Sand finish: a fine, even grain made with a sponge or rubber float
- Smooth: a steel-troweled face that shows every flaw
- Lace or skip trowel: flattened peaks over a sand base
- Dash: material sprayed on for a coarse look
Cement color coats stay breathable, acrylic color coats flex more and offer brighter colors, and paint is optional once the wall has fully cured.
Apply Stucco: One- and Two-Coat Alternatives
One-coat systems use a proprietary, fiber-reinforced base mixed exactly to the manufacturer’s water ratio.
Minimum thickness comes from each product’s ICC-ES evaluation report, often 3/8 inch, with many specifications calling for 1/2 inch nominal.
Two-coat systems skip the separate scratch coat and suit masonry or concrete, where code allows two coats.
The finish coat on a two-coat wall cannot go on sooner than 7 days after the first coat.
Expansion Joints (Detailed)
Control joints relieve shrinkage inside the plaster, while expansion joints absorb expansion and contraction of the building.
Typical locations include:
- Floor lines on multi-story wood-frame houses
- Points where stucco meets brick, siding, or concrete
- Structural expansion joints in the frame
To seal a joint, clean it, press in a closed-cell backer rod slightly wider than the gap, and tool a compatible elastomeric sealant over it.
Curing, Cleaning, And Maintenance
Misting schedule
- Scratch coat: fog mist lightly several times a day for 48 hours, more often in heat or wind.
- Brown coat: repeat for 48 hours, then let it dry until finish day.
- Finish coat: follow the manufacturer, because cement finishes usually get misting and acrylic finishes do not.
Inspection: Walk the house at least once a year and after big storms, looking for cracks, stains, and bulges.
Cleaning: Rinse walls once or twice a year on low pressure, and use a mild bleach and water solution on mildew stains.
Point sprinklers away from walls so water does not soak the stucco base.
Patching: Brush out a hairline crack, fill it with paintable acrylic caulk, sponge on texture, and paint to match.
This stucco crack repair guide covers wider cracks.
Professional repairs: Call a pro when cracks keep growing, stains return, or the wall feels soft.
Substrate Differences: Masonry Versus Wood Sheathing
Sound masonry needs minimal prep: clean it, dampen it, and add a bonding agent on smooth concrete.
Rough, absorbent block or concrete accepts stucco applied directly, with no paper or lath.
Over plywood or OSB, crews install two layers of WRB, then fasten self-furring galvanized lath into the studs.
The scratch coat over lath needs at least 3/8 inch under IRC Section R703.7.
Over masonry, published minimums for the whole two-coat system range from 1/2 to 5/8 inch.
The spread exists because older code tables list 1/2 inch while ASTM C926 summaries cite 5/8 inch, so local code and the product sheet decide.
Troubleshooting And Frequently Asked Questions
What causes stucco to crack after installation?
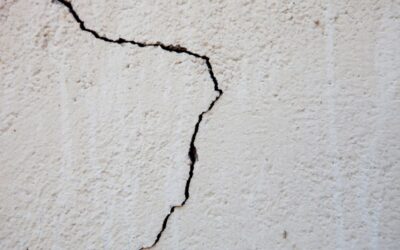
Stucco cracks after installation mostly come from rushed curing, missing control joints, thin base coats, and framing movement.
Cracks that appear within weeks often point to fast drying or a skipped wait between coats.
Diagonal cracks from window corners suggest missing joints.
Horizontal cracks near floor lines usually mean the framing shrank without an expansion joint.
How can you tell if moisture is getting behind stucco?
Moisture behind stucco usually shows up as dark stains below windows, bubbling paint, white deposits, or soft spots near the weep screed.
Musty indoor smells and mold on interior walls are warning signs too.
This guide on spotting stucco water damage walks through each symptom.
A moisture meter test confirms the problem.
When should you consult a stucco specialist?
You should consult a stucco specialist when cracks grow, stains return after cleaning, or the wall sounds hollow.
A specialist is also worth calling after a roof leak, a failed window, or mold inside the house.
These problems often start behind the surface, where paper, flashing, or the weep screed has failed.
Early testing costs less than tearing off a wall.
Can I do stucco myself?
Yes, you can do stucco patches yourself, but a full installation belongs to trained plasterers.
New stucco needs correct paper laps, flashing, lath fastening, timed coats, and careful curing.
Mistakes stay hidden until water damage appears years later.
Many cities also require permits and lath inspections, so learning the basics helps you judge work that is installed properly.
Can you put stucco directly on concrete?
Yes, you can put stucco directly on concrete if the surface is clean, rough, and absorbent enough to bond.
Painted, sealed, or very smooth concrete needs roughening or a bonding agent first.
Code allows two coats over concrete instead of three.
Lath is usually unnecessary on sound concrete, but crumbling surfaces need repair before plaster goes on.
Safety, Cleanup, And Final Walk-Through
PPE: Crews wear safety glasses, waterproof gloves, long sleeves, boots, and dust respirators while mixing, because wet cement is alkaline and burns skin.
Scaffold safety: A competent person inspects scaffolding before each shift, workers above 10 feet use guardrails or fall arrest, and nobody climbs cross braces.
Cleanup: The crew washes tools before plaster sets, pulls protective sheets, cleans windows, hauls debris, and confirms the weep screed is clear.
Walk-through: Schedule it after the finish coat has cured and the scaffolding is down, then check texture, color, sealed joints, and glass before the project is called complete.
Time Is an Ingredient
A stucco wall is only as strong as the patience behind it.
Two to four weeks may feel slow, but that is how a wall that keeps rain out for decades is achieved.
Stucco Contractor Pro
Phone: (626) 737-0053
Email: bryan@modernbuilderscali.com
Address: 3801 S Michillinda Dr, Pasadena, CA 91107

Bryan Peralta is the Owner and CEO of Modern Builders, a Southern California contractor specializing in stucco remediation, waterproofing, and building envelope restoration. With years of experience helping homeowners and commercial property owners protect their properties, Bryan is known for delivering high-quality craftsmanship and long-lasting solutions. Through Modern Builders, he shares expert insights on stucco repair, waterproofing, and exterior building maintenance.