If you’ve ever heard a contractor say “stucco on a frame,” they’re talking about a stucco exterior installed over a wood-framed wall (not over solid masonry like block or concrete). This is extremely common in Southern California—especially in areas like Pasadena and the San Gabriel Valley, where many homes are wood-framed but finished with a classic stucco look for durability and curb appeal.
Below is a clear, homeowner-friendly breakdown of what it means, what’s inside the wall, and why the “layers” matter so much.
Stucco on a Frame: The Simple Definition
Stucco on a frame is a wall system where cement-based plaster (stucco) is applied over wood framing using protective moisture barriers and a reinforcement layer (typically metal lath or an approved alternative).
Think of it like this:
- The frame (wood studs) is the skeleton
- Sheathing + weather protection helps keep water out
- Lath/reinforcement gives the stucco something to “grab” onto
- Stucco coats build thickness, strength, and the final texture
Done right, it creates a tough, long-lasting exterior finish that can handle heat, sun exposure, and seasonal rain.
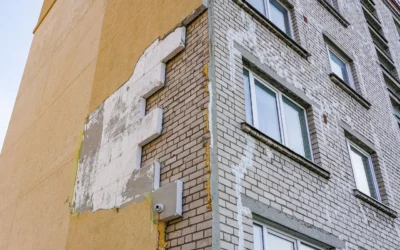
What’s Actually Behind Stucco on a Wood-Frame Wall?
While every project can vary based on the home’s age and local code requirements, a typical stucco-over-frame assembly includes:
1) Wood framing (studs)
Most homes in Pasadena and surrounding areas are built with wood studs. Stucco isn’t applied directly to studs—it needs backing layers for support and moisture control.
2) Sheathing (often plywood or OSB)
This is the solid surface attached to the studs. It stiffens the wall and provides a flat plane for the next layers.
3) Weather-resistive barrier (WRB)
This is one of the most important parts of stucco on a frame. Stucco is not a “waterproof shell” by itself—moisture management matters. The WRB helps protect the sheathing and framing from water intrusion.
4) Flashing and weep components
Good stucco work isn’t only about the finish—it’s about details. Flashing at windows/doors and weep systems at the base are key to helping any incidental moisture drain out instead of getting trapped.
5) Lath or reinforcement
Traditionally, metal lath is attached over the WRB. The stucco bonds to the lath mechanically, which is why the lath installation and fastening patterns matter.
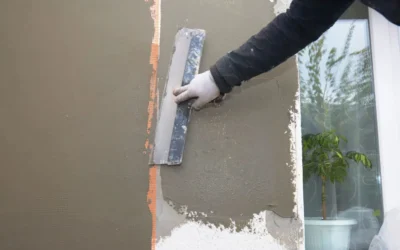
6) The stucco coats (the part you see)
This is the “plaster” portion—built in coats that form the final exterior surface.
Two Common Types: Three-Coat vs. One-Coat Stucco (on Frame)
When people say “stucco,” they often assume it’s all the same. In reality, the system can be built in different ways depending on the wall and project goals.
Three-coat stucco (traditional)
This is the classic approach and is still widely used:
- Scratch coat – first coat that keys into the lath
- Brown coat – builds thickness and creates a flatter plane
- Finish coat – texture and color (or a paint/coating is applied later)
This method is known for being robust when installed correctly.
One-coat stucco (modern systems)
“One-coat” is a bit of a nickname—there are still layers, but the base is typically combined/engineered differently (often with a foam backing board and a reinforced base coat). The big takeaway is that it’s a different system, and it must be installed according to the manufacturer’s requirements for it to perform well.
(If you’re comparing options for your home, it’s worth asking what system is being proposed—and why.)
Why the “Frame” Part Matters (and Why Installation Details Are Everything)
Stucco on masonry is different because the wall behind it is already solid and non-combustible. On a wood-framed home, you’re protecting structural lumber and sheathing—materials that can be damaged by trapped moisture over time.
That’s why professional stucco contractors focus heavily on:
- Proper moisture barriers and overlaps
- Correct window/door flashing integration
- Control joints and sealant transitions where needed
- Texture matching during repairs (so patches don’t stand out)
- Coatings/finishes appropriate for sun exposure and weather swings
In climates like Pasadena—where you can get intense sun, periodic heavy rain, and wind events—these details help prevent cracking, staining, and premature failure.
Common Signs Your Stucco-on-Frame Exterior Needs Attention
If you’re a homeowner trying to figure out whether your stucco is “fine” or quietly developing issues, watch for:
- Cracks that keep returning after patching
- Brown staining below windows or roof/wall intersections
- Bubbling or peeling paint/coating on stucco
- Soft spots or “spongy” feeling around trim areas
- Interior drywall staining that lines up with exterior walls
Not every crack means disaster—some hairline cracking can be normal—but repeating cracks in the same areas usually point to movement, poor joint detailing, or moisture-related issues that should be evaluated.
Stucco Repairs vs. Re-Stucco: How to Think About the Next Step
A quick patch can be appropriate when:
- The cracks are minor and isolated
- The underlying system is sound
- Water is not getting behind the stucco
A larger repair or partial re-stucco may be needed when:
- Damage repeats in multiple locations
- There’s widespread delamination (stucco separating)
- Moisture intrusion is suspected around penetrations/openings
The right approach depends on why the damage is happening—not just what it looks like on the surface.
Bringing It Back to Pasadena: Why Local Experience Helps
Homes across Pasadena, San Marino, Sierra Madre, and nearby Northeast LA neighborhoods often have architectural details (eaves, trim transitions, older window installs, additions over time) that make stucco tie-ins tricky. Working with a contractor who regularly handles stucco application and repair in Pasadena—alongside related exterior trades like roofing, drywall, and painting—can make the project smoother because the system works as a whole.